Hey! Welcome! Meet the New Growth pillow pattern #NewGrowthPillow #AlexandraBordalloPatterns
Are you interested in learning how to make a patchwork pillow using a quilt as you go method? Oh! I am sure you will LOVE the New Growth free pillow pattern.
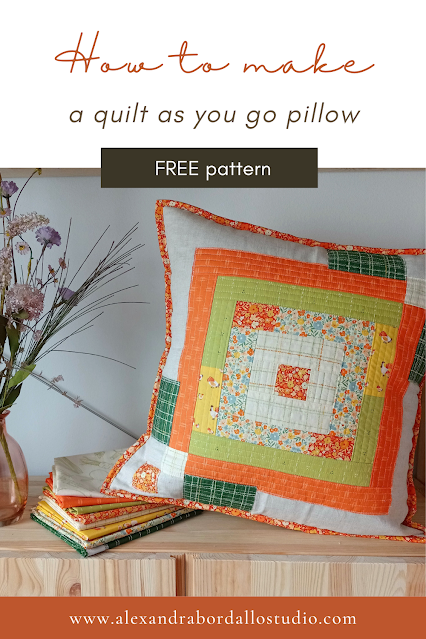
This easy, beginner-friendly sewing tutorial will show you how to make an 18.5" x 18.5" quilt-as-you-go panel, which can be turned into a mini quilt or a quilted pillow - like I did!
I have designed this new quilt-as-you-go free pillow pattern as part of the Handmade Holiday Challenge.

The New Growth pillow pattern is perfect for beginners and a fun way to use scraps of fabric from your stash. I hope you give this a try!
Share your projects on Instagram using #NewGrowthPillow and tag me @alextilalila so I can see your beautiful versions :)
NOTE: This is an improv quilt as you go (qayg) tutorial so have fun. You can use different fabric measurements for a new look! Imperfection is the key for this project so don't worry if the measurements don't match perfectly.
___________
B E F O R E G E T T I N G S T A R T E D
- The quilt-as-you-go method (aka QAYG) is a fun, imperfect and addictive technique with lots of possibilities. Instead of piecing and then quilting your project, you'll be piecing and quilting as you go.
- In this tutorial you'll be stitching the fabric to the background, using straight quilting lines (about half an inch apart aprox). It's important to start and end your stitches on the background fabric.
- Set up your machine to quilt. You can use your walking foot or your regular foot.
- Use a slightly longer stitch length - a 3.00 or 3.50 stitch length.
- Trim off all your thread ends at the end of each piece of fabric.

_____________


.png)


W H A T Y O U W I L L N E E D
- Linen fabric - Background (20" x 20")
- Batting (1) 22" x 22"
- Scraps of fabric from your stash:
For this tutorial I am using my Grow and Harvest fabric collection for Art Gallery Fabrics:

____________
M A K I N G T H E Q A Y G F R O N T P A N E L
SEWING INSTRUCTIONS
- First of all, place your 20" x 20" background fabric (I am using linen fabric but you can choose a solid or low volume printed cotton fabric too!) and place it on the top of your 22" x 22" batting. OPTIONAL: add another layer of fabric (22" x 22" aprox.) as back, so you will have the backing, the batting and the background fabric on top.
- Fold the batting + background in half, and half again, finger press to make a crease in to find the center.
- Place (1) 2" x 2" - Fabric A square in the center. Following the left edge of the fabric, start sewing horizontal quilting lines from left to right all the way across this first square of fabric (Fig 1).

- Place (1) 1.75" x 2" Fabric B piece right sides together (RST) with the center quilted section, lining up the edge of the fabric to the side you want to join. Stitch a 1/4" seam along the edge (Fig 2).
- Open and finger press. Then quilt vertically following the seam as a guide. Keep sewing quilting lines from right to left until all the fabric is quilted (Fig 3). Repeat with the remaining (1) 1.75" x 2" Fabric B piece (Fig 4).

- Place a 1.75" x 5" Fabric B strip RST to each side of the quilted section (Fig 5). Lining up the edge of the fabric to the side you want to join. Stitch a 1/4" seam along the edge. Quilt horizontally until all the fabric is quilted.
Continue this method of adding strips of fabric following the diagrams below to complete the quilt-as-you-go front panel.
Some of the strips are made of two different fabrics. Take a look at Fig 7. I am sewing RST (1) 1.75" x 5" Fabric C strip and (1) 1.75" x 2.25" Fabric A strip to create (1) 9.5" strip. You can use (2) 1.75" x 9.5" strips instead for a different look.


- Your quilt-as-you-go front panel should look like shown below (Fig 12).
- Place (2) 3.5" x 3.5" Fabric G squares on the top of the quilted panel, RST as shown below. Stitch a 1/4" seam along the edge (Fig 13).
- Open and finger press. Then quilt horizontally following the seam as a guide (Fig 14). This time you'll be using the raw edge applique method to attach the final squares. It is important to start and end your stitches on Fabric G squares.

- Repeat with the remaining (2) 3.5" x 3.5" Fabric G squares (Fig 15).
- Place (2) 1.75" x 1.75" Fabric A squares in each corner as shown below (Fig 16). Attach them using the raw edge applique method.
- Trim your pillow front panel to 18.5" x 18.5" square.

Congratulations! Your quilt-as-you-go panel is done. Now you can add the binding and use it as a wall hanging mini quilt (which I think is adorable!) or you can turn it into a pillow cover, like I did!

____________
H O W T O M A K E A N E N V E L O P E B A C K E D P I L L O W
WHAT YOU WILL NEED
- Batting (1) 21" x 16" and (1) 21" x 11"
- Backing - top piece (19" x 14.5") - Fabric H
- Backing - bottom piece (19" x 9.5") - Fabric E
- Binding (3) 2.5" x WOF strips or 125" binding
SEWING INSTRUCTIONS
- Lay down the backing pieces on the top of the of batting. OPTIONAL: add another layer of cotton fabric as back.
- Quilt as desire. I quilted them with my Bernina using a wave stitch (see picture below).
- Trim the top piece to 18.5" x 14" and the bottom piece to 18.5" x 9".

- Attach the binding to the bottom 18.5" edge of the top quilted piece and to the top edge of the bottom quilted piece as shown below (Fig 18).
.png)
- Place the QAYG panel (the pillow top) right side down. Place the bottom backing rectangle on the bottom of the pillow, right side up. Next add the top backing piece on the top, right side up (Fig 19). The binding edges should overlap 4" aprox.
- Pin the backing in place. Sew a 1/4" seam around all four edges of the pillow.
- Attach the binding and your new pillow cover is done! I used 2 1/2" inch strips for my binding, machine sew to the front and to the back of the pillow. You can use any method you like.
I hope you find this tutorial helpful and go forth and make lots of New Growth pillows! I'm eager to see your beautiful versions. Please, feel free to ask anything in comments, I'll do my best to help you!
SHARE IT ON SOCIAL MEDIA!
Use #NewGrowthPillow #AlexandraBordalloPatterns and tag me @alextilalila so I can see your projects :)

____________
DON’T MISS OUT ON ALL THE HANDMADE HOLIDAY TUTORIALS
_______
PIN THIS TUTORIAL FOR LATER!

Comments
Post a Comment